![NextPatient_Logo_RGB_Charcoal (2).png]](https://help.nextpatient.co/hs-fs/hubfs/Logos/NextPatient%20Logos/NextPatient_Logo_RGB_Charcoal%20(2).png?height=31&name=NextPatient_Logo_RGB_Charcoal%20(2).png)
You can add new providers to your NextPatient account and configure how they appear in your online scheduling widget.
This guide walks you through creating a provider, updating their settings, and completing any additional configuration needed for online scheduling.
Access your provider settings
- Log in to your NextPatient account.
- Select the practice location where you'd like to add the provider, if you have access to multiple locations.
- Navigate to Settings > Providers.

Add and configure your provider
From the Providers tab, click "Add Provider." Enter the information for your new provider and configure their scheduling preferences.
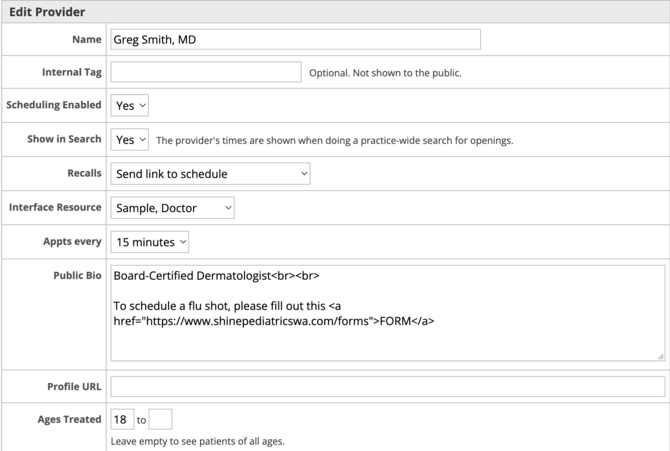
Provider information
- Name: The patient-facing name displayed in your online scheduling widget (e.g., Dr. John Smith or John Smith, MD).
- Internal Tag: A private label used to distinguish duplicate provider configurations or identify special setups, such as Call to Schedule, Reminders Only, or Display Only.
- Public Bio: A brief description of the provider that patients can view when scheduling. We recommend keeping this to 1–3 sentences for a better mobile experience.
- Profile URL: A link to a more detailed provider biography on your practice's website, if available.
- Ages Treated: The minimum and maximum patient ages the provider accepts, if applicable.
Provider photos: To add or update a provider photo, see Add or update a provider photo for submission instructions.
Scheduling and visibility
- Scheduling Enabled: Select Yes to enable online scheduling for this provider. Available appointments will only display when the provider's availability and other scheduling requirements are properly configured.
- Show in Search: Select Yes when you're ready for the provider to appear in your online scheduling widget.
- Interface Resource: Select the corresponding provider or resource from your practice management system to ensure appointments are associated with the correct resource.
- Appts Every: Choose the appointment interval used to display available scheduling times for this provider.
Don't see your provider in the Interface Resource dropdown? You may need to synchronize your practice management system with NextPatient. See Synchronizing the Interface for instructions.
Follow-up care and notifications
- Recalls: Configure how patients due for follow-up care should be prompted to schedule their next appointment. Available options include:
- Off: Disable recalls for this provider.
- Send link to schedule: Invite patients to schedule their follow-up online.
- Send link to schedule or ask to call: Provide online scheduling or phone scheduling instructions.
- Ask patient to call: Direct patients to contact your practice to schedule.
- Notifications: Enter the email address or phone number of the provider or staff member who should receive appointment booking notifications.
Save your provider
Once you've completed the required fields and reviewed the provider's settings, click Update to save your changes.
Complete additional scheduling setup
Depending on your practice's configuration, you may need to complete additional steps before the new provider is ready for online scheduling.
Restrict appointment types by provider
If your practice limits which appointment types can be scheduled with specific providers, you'll need to configure those restrictions for your new provider.
See Restrict appointment types for providers for instructions.
Configure the provider's schedule
Practices using CareCloud or drchrono may also need to create a provider schedule template in NextPatient.
See Create a new provider schedule template for step-by-step instructions.
Test your provider's availability
Once you've completed the provider's setup, we recommend testing their availability in your patient-facing scheduling widget.
- Open your practice's online scheduling widget.
- Depending on your widget's configuration, either select the new provider directly or select an appointment type that the provider offers.
- Confirm that the provider appears as a scheduling option, if applicable.
- Check that the appropriate appointment types and available appointment times display as expected.
If the provider or their availability isn't appearing as expected, double-check their Scheduling Enabled, Show in Search, and Interface Resource settings, along with any appointment type restrictions or schedule configurations.
If you're still having trouble, reach out to your Customer Success Manager for assistance.
Need help?
If you have questions about adding a provider, configuring scheduling settings, or making a new provider available for online booking, please contact your Customer Success Manager or email help@nextpatient.co.